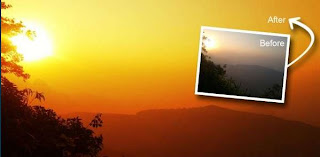
Although it sounds simple, shooting photos of sunset can be very tricky. You have to reach the location early and wait for sundown with all your photographic equipment at the ready. And despite taking all the measures, you may not get that burning glow like you see in travel brochures. These problems don’t always rise due to it being the wrong time of the year for shooting sunsets or incorrect exposure settings. Factors such as good weather, the presence of clouds and visibility also affect the result. Hence, no matter how hard you try or how many shooting techniques you use, capturing that beautiful shot may just not be possible.
In this tutorial, we will show you how you can transform photos of sunsets that aren’t spectacular into stunning works of art. Using Photoshop may sound intimidating to some of you, but it’s actually very easy and requires just a few easy steps. To begin with, you can use a photo of a landscape or natural environment that's been shot in the evening hours. Silhouettes of boats and trees and cityscape in the background add to the drama. And you may find it strange, but you don’t really need the setting sun in the frame. With the help of a few tricks, you will have an eye-catching golden sunset in less than 15 minutes.
Step 1: Open Gradient Map
 |
| Create a new layer with Gradient Map |
Load the photo in Photoshop. Duplicating the background layer is not necessary in this step because all the editing will be done on a separate layer. Click on the “Create new fill or adjustment layer” button at the bottom of the Layers panel and select “Gradient Map”. You can also click on the “Gradient Map” button in the Adjustments panel. This will create a new layer over the background layer and can be seen in the Layers panel.
Step 2: Edit the gradient
Step 2: Edit the gradient
Clicking on the gradient type opens up the Gradient Editor in a dialogue box. As soon as it comes up, you’ll see a real time preview of the gradient that’s currently selected. This tool will allow you to add the burning colours of the sunset to the photograph.
Step 3: Set the colours of the gradient
Step 3: Set the colours of the gradient
 |
| Edit the gradient using the colour palette |
You now have to adjust the gradient bar to add a deep orange to yellow gradient. Double-click on the Color Stop slider on the extreme bottom-left of the gradient bar and then pick a deep orange colour from the palette that shows up. Next, click on the Color Stop slider at the right end and pick yellow. After clicking OK, you should see an orange to yellow gradient layered over the photo. If you’re not satisfied with the colours, you can go back to the editor and reselect them.
Step 4: Blend the layers
Step 4: Blend the layers
 |
| Set the layer blending mode to Overlay or Color |
The superimposed gradient looks strong and unrealistic without editing. To set this right, change the blending mode of the layer to Overlay from the drop-down list. You can also experiment with other blending modes and select the one that you like.
Step 5: Adjust the curves
Step 5: Adjust the curves

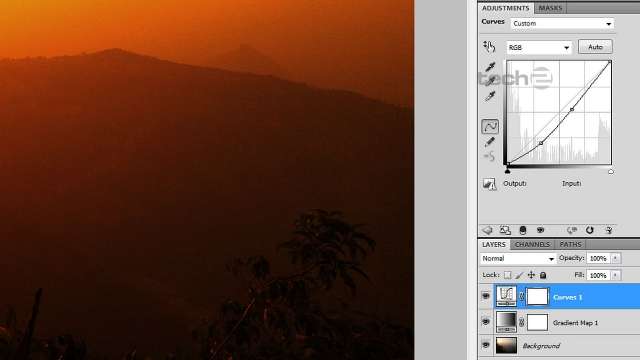
If the colours appear too vibrant after blending the layer, reduce the opacity of the layer as needed. In our case, we found 75 percent opacity just perfect. Now click on the “Create new fill or adjustment layer” button in the Layers panel again, and this time select “Curves”. Clicking and dragging a point of the curve will adjust the highlights, shadows and black levels.
Step 6: More effects?
If you want to add more effects (such as a vignette, which looks nice), use an application like PhotoScape. You get a raft of filters and effects that can be applied easily (much easier than Photoshop).
After you’re done, save the PSD file in case you want to adjust the gradient colours, blending mode or curves. For social networks and online photo galleries, save the final result as a JPEG file.


